プロジェクトの作成
今回のアプリは、ボールが転がっているように見えるアニメーションを実装します。まずは新規プロジェクトを作成します。
- [Application name] に [Ball] と入力し [次へ] をクリック

- [Phone and Tablet] をチェックし [Minimum SDK] は [API 19: Android 4.4 (KitKat)] を選択し [次へ] をクリック

- [Blank Activity] を選択し [次へ] をクリック

-
全てそのままで [終了] をクリック

Ball クラスの作成
次に画面内を転がるボールのクラスを作成します。ボールは画面内での位置を示す座標と半径をメンバ変数として持ちます。また、ボール自体を画面内に描画するメソッドも持っています。
- "Ball.java" を以下のソースコードに書き換え
package com.example.ball;

import android.content.Context;
import android.graphics.Canvas;
import android.graphics.Color;
import android.graphics.Paint;
import android.view.View;

public class Ball extends View {
    int x, y, radius;
    Paint paint;

    public Ball(Context context) {
        super(context);
        radius = 30;
        x = y = 0;
        paint = new Paint();
        paint.setColor(Color.WHITE);
        paint.setStyle(Paint.Style.FILL);
    }
    protected void onDraw(Canvas canvas){
        super.onDraw(canvas);
        canvas.drawCircle(x, y, radius, paint);
    }
}
アニメーションの実装
アニメーションを実現するには MainActivity に Runnable インタフェースを実装します。
- "MainActivity.java" を以下のソースコードに書き換え
package com.example.ball;

import android.app.Activity;
import android.graphics.Color;
import android.graphics.Point;
import android.os.Bundle;
import android.os.Handler;
import android.view.Display;
import android.view.Window;
import android.view.WindowManager;
import android.widget.RelativeLayout;

public class MainActivity extends Activity implements Runnable {
    Ball ball;
    Handler handler;
    int width, height;
    int dx = 10, dy = 10, time = 10;

    @Override
    protected void onCreate(Bundle savedInstanceState) {
        super.onCreate(savedInstanceState);
        getWindow().addFlags(
                WindowManager.LayoutParams.FLAG_FULLSCREEN);
        requestWindowFeature(Window.FEATURE_NO_TITLE);
        RelativeLayout relativeLayout = new RelativeLayout(this);
        relativeLayout.setBackgroundColor(Color.GREEN);
        setContentView(relativeLayout);

        handler = new Handler();
        handler.postDelayed(this, time);

        WindowManager windowManager =
                (WindowManager)getSystemService(WINDOW_SERVICE);
        Display display = windowManager.getDefaultDisplay();
        Point point = new Point();
        display.getSize(point);
        width = point.x;
        height = point.y;
        ball = new Ball(this);
        ball.x = width / 2;
        ball.y = height / 2;
        relativeLayout.addView(ball);
    }
    @Override
    public void run() {
        ball.x += dx;
        ball.y += dy;

        if (ball.x <= ball.radius) {
            ball.x = ball.radius;
            dx = -dx;
        } else if (ball.x >= width - ball.radius) {
            ball.x = width - ball.radius;
            dx = -dx;
        }

        if (ball.y <= ball.radius) {
            ball.y = ball.radius;
            dy = -dy;
        } else if (ball.y >= height - ball.radius) {
            ball.y = height - ball.radius;
            dy = -dy;
        }

        ball.invalidate();
        handler.postDelayed(this, time);
    }
    public void onDestroy() {
        super.onDestroy();
        handler.removeCallbacks(this);
    }
}
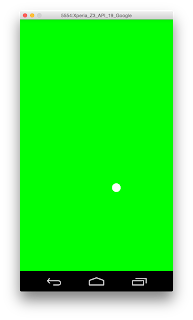
実行すると、芝生の上をゴルフボールが転がるようなアニメーションをします。画面の端まで到達すると跳ね返って転がり続ける様子も確認できます。
次は、作成したアプリを実機にインストールする手順を紹介します。


ソースコードを参考に動かしてみたのですが、エラー: シンボルを見つけられません。シンボル: クラス Activityなどのエラーが出てしまいます。もしわかるようでしたら教えて頂きたいです。
返信削除ソースコードに以下2点の記載を追記しました。
削除・パッケージ名(1行目の package〜)
・クラスのインポート(3行目以降の import〜)
エラーはクラスがインポートされていないことによるものと思われます。
パッケージ名はご自身のプロジェクトによっては書き換えが必要です。
この記事通りの手順で進めていただければ、問題無く動くはずです。
ご指摘ありがとうございました。
Android Studio 4.1.2の場合は次の通り。
返信削除(日本語化していないので英語表記です)
Project Template: Basic Activity
デフォルトのPackage nameの「com」と「example」が逆。
(Android Studio 4.1.2のデフォルトがおかしい)
Name: My Application
Package name: example.com.myapplication
Nameだけの設定だと「example.com.ball」になってしまう。
Name: Ball
Package name: example.com.ball
なのでPackage nameを「com.example.ball」に変更する。
Name: Ball
Package name: com.example.ball
また、Ballクラスを作成するときは記事と少し変わります。
[app]->[java]まで行って右クリックしないと
[New]->[Java Class]が現れません。
なので素直に
[app]->[java]->[com.example.ball]まで行って右クリック
[New]->[Java Class]を選択。
クラス名[Ball]を入力して[Enter]
"Ball.java"を記事ののソースコードに書き換え。
となります。
u40tthww
返信削除sightcare
cialis 5 mg satın al
cialis 20 mg
viagra
cialis 100 mg
https://shop.blognokta.com/urunler/ereksiyon-haplari/kamagra-100-mg-oral-jel-7-sase-etkili-sertlestirme-ilaci/
glucotrust